Scanning in OT Environments

🌐✨
Intro
This blog post delves into the necessity of specialized security scanning in OT environments, highlights effective techniques and tools for the task, provides insights from my real-world case studies, and outlines a methodology for scanning in OT environments. Whether you’re a cybersecurity professional, plant engineer, network administrator, or simply keen on understanding the nuances of OT security, this section aims to equip you with the knowledge to conduct effective, responsible, and safe network assessments and scanning.
Uses cases:
Creating a comprehensive OT asset inventory which is a foundational step that paves the way for more in-depth processes like vulnerability scanning, which we’ll explore in a future post.
Examining the role of this scanning approach in both OT penetration testing and red teaming, particularly during the discovery phase to identify potential target hosts and OT devices.
Preparing for OT risk assessments, highlighting the importance of this scanning methodology in understanding and mitigating risks within OT environments.
Necessity for Tailored Scanning in OT Environments
OT environments, encompassing everything from manufacturing plants to electrical utility infrastructure, cannot be scanned, queried, or interrogated in the same way as enterprise IT systems due to several factors:
System Sensitivity: Many OT systems and assets often control physical processes like conveyor belts, fire supression systems, elevators, temperature regulators, and more. Unintended disruptions can lead to physical consequences, posing risks to safety and operational continuity.
Legacy Systems: Many OT environments operate outdated software and hardware, not originally designed for connectivity, making them susceptible to modern cyber threats.
Operational Priorities: Unlike IT environments, where data integrity and confidentiality are paramount, OT prioritizes system availability and reliability. Scanning can present a risk in device and process availability.
These unique challenges necessitate tailored security scanning approaches, ensuring both the integrity and operational efficiency of these critical systems.
Preparation
When I approach scanning OT environments, it is typically in the form of some type of professional service like a technical security assessment, red teaming, or penetration test. Under these conditions, I am commonly assigned a point of contact (POC) who has intimate knowledge of the OT environment that I am assessing. In prepration for the scanning activity, I typically ask for the following items from my POC:
What is in-scope for the engagement?
This question is extrememly important because you don’t want to scan anything without formal and expressed permission. Scanning out-of-scope systems can result in unintended kinetic effects within the OT environment. Imagine scanning assets within a plant’s safety system without permission and you cause processes to fail that protect plant staff from chemical exposure, no thank you.
Understand the industrial processes
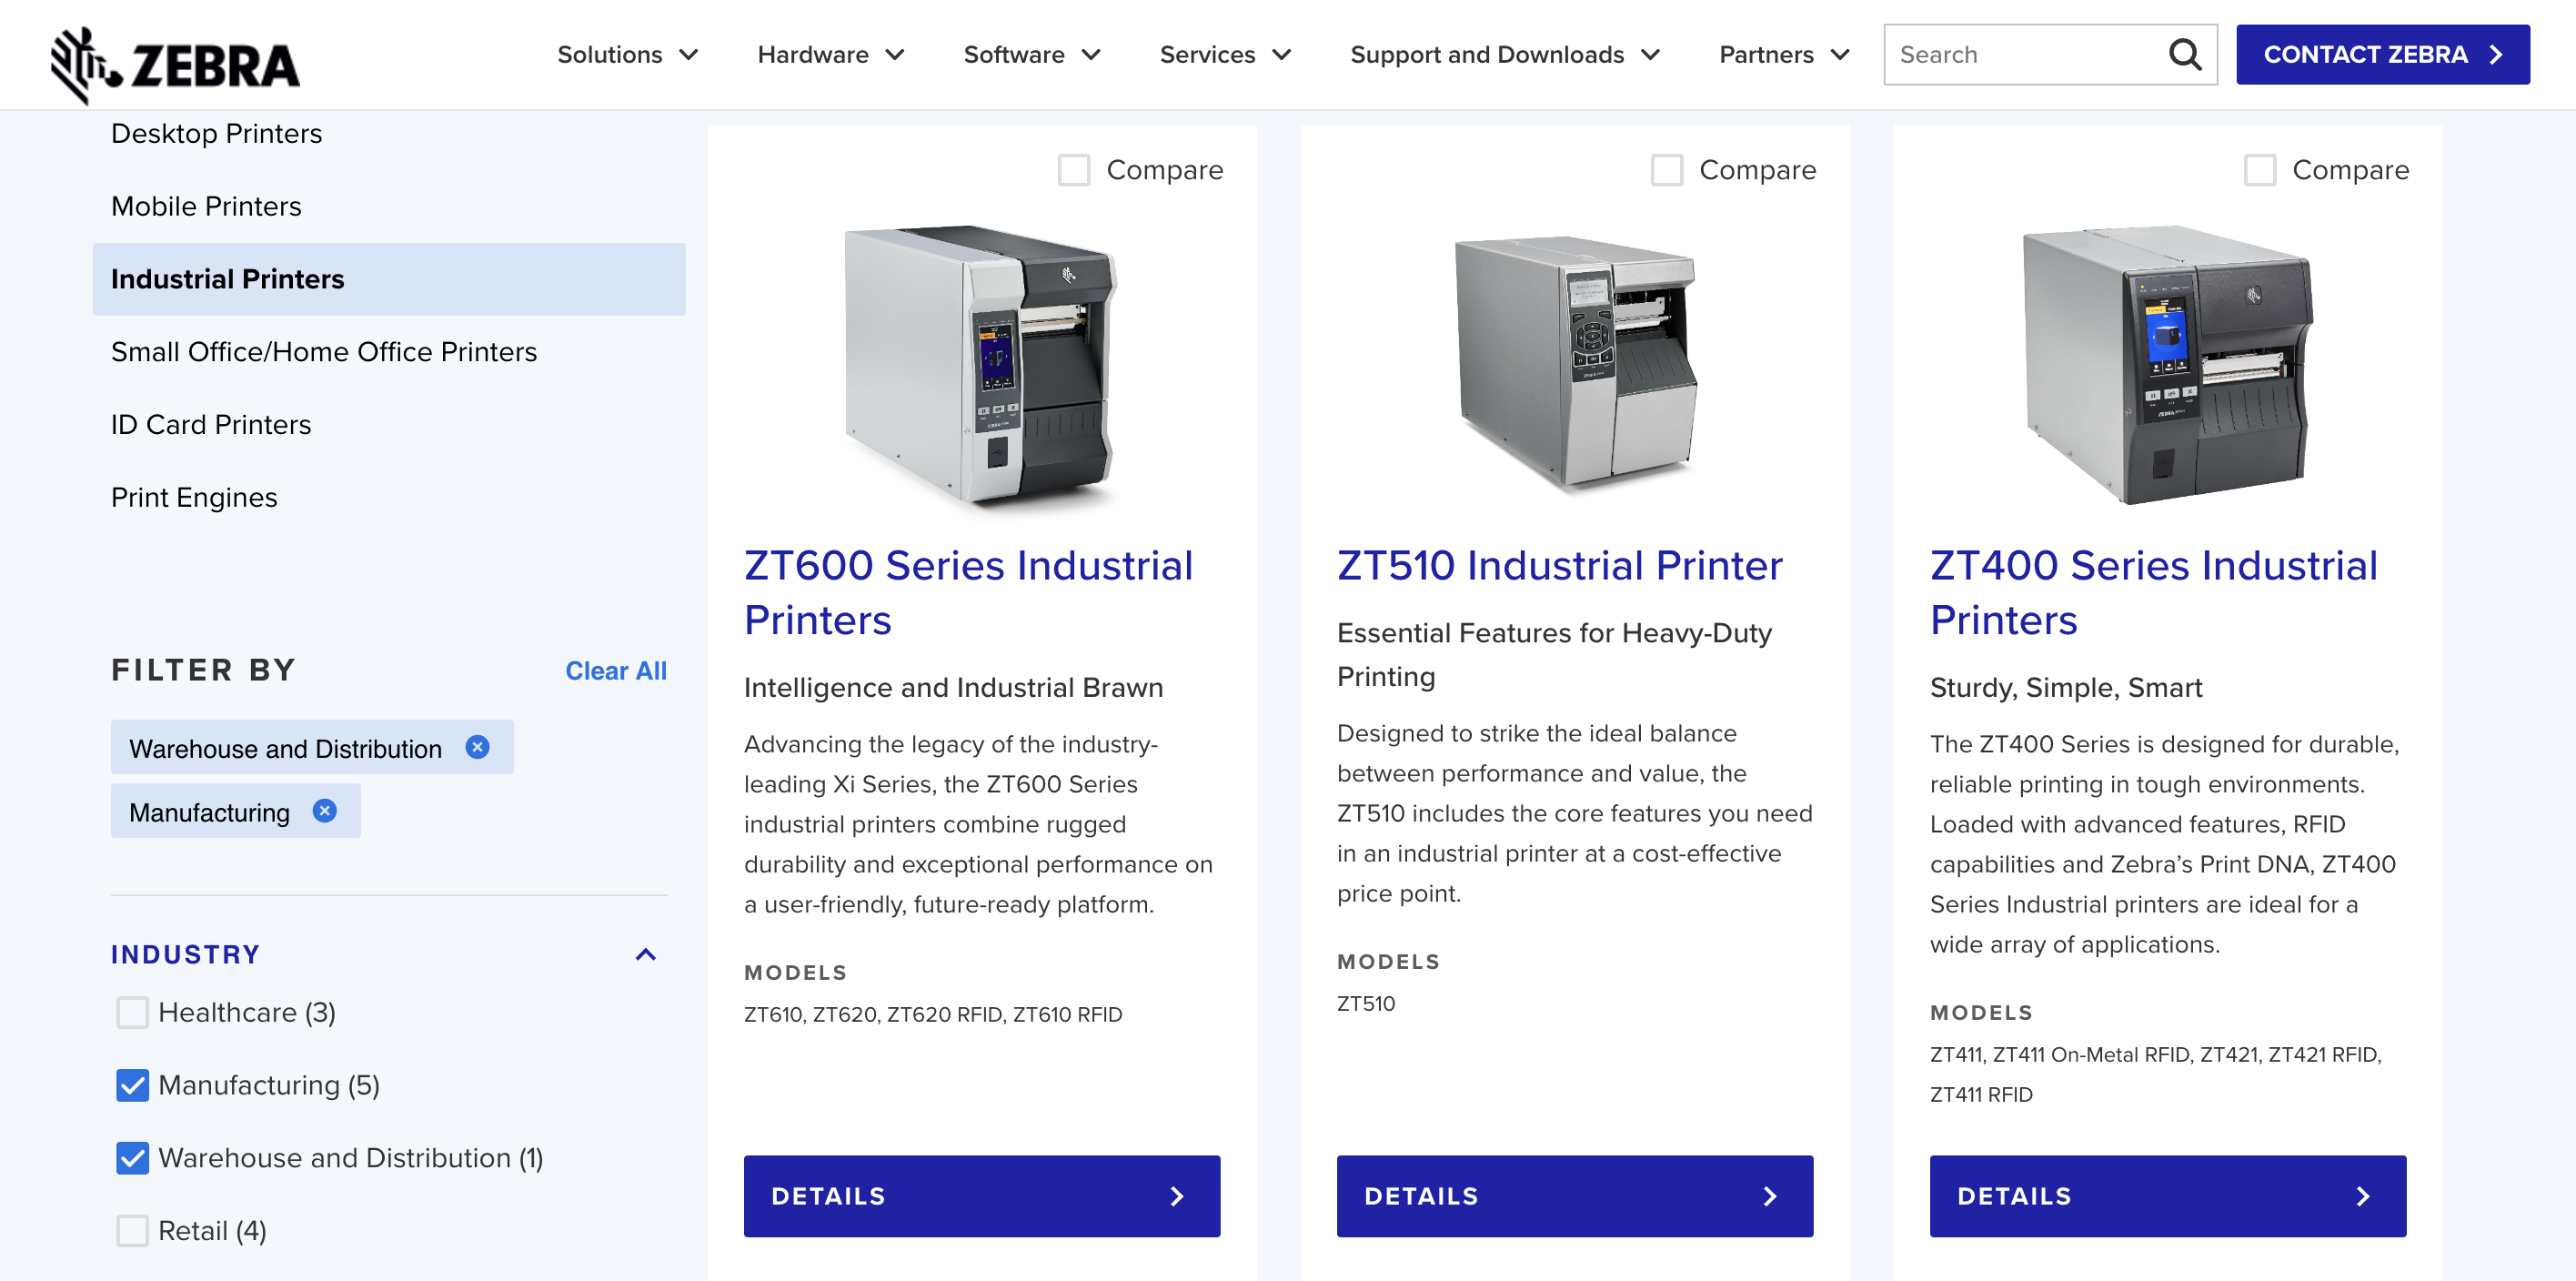
I remember conducting an internal pentest within a plant that manufactured a variety of products including license plates. During my initial discover scans, I found many Zebra-branded printers in various locations around the facility. The only other time i’ve run into Zebra printers were within small office environments but this was different. After researching the “ZT” brand of Zebra printers and speaking to the POC during, these were no run-of-the-mill office printers, these were Zebra printers that were integral to the industrial process.
These printers were positioned at the end of every conveyor line for the purpose of labeling the tracking information for everything coming off the line. Not only were they important to the manufacturing process but they also informed the supply-chain process for teh organization’s business operations.
Example of the type of industrial Zebra printers:
Sharpen and tune your tools of choice
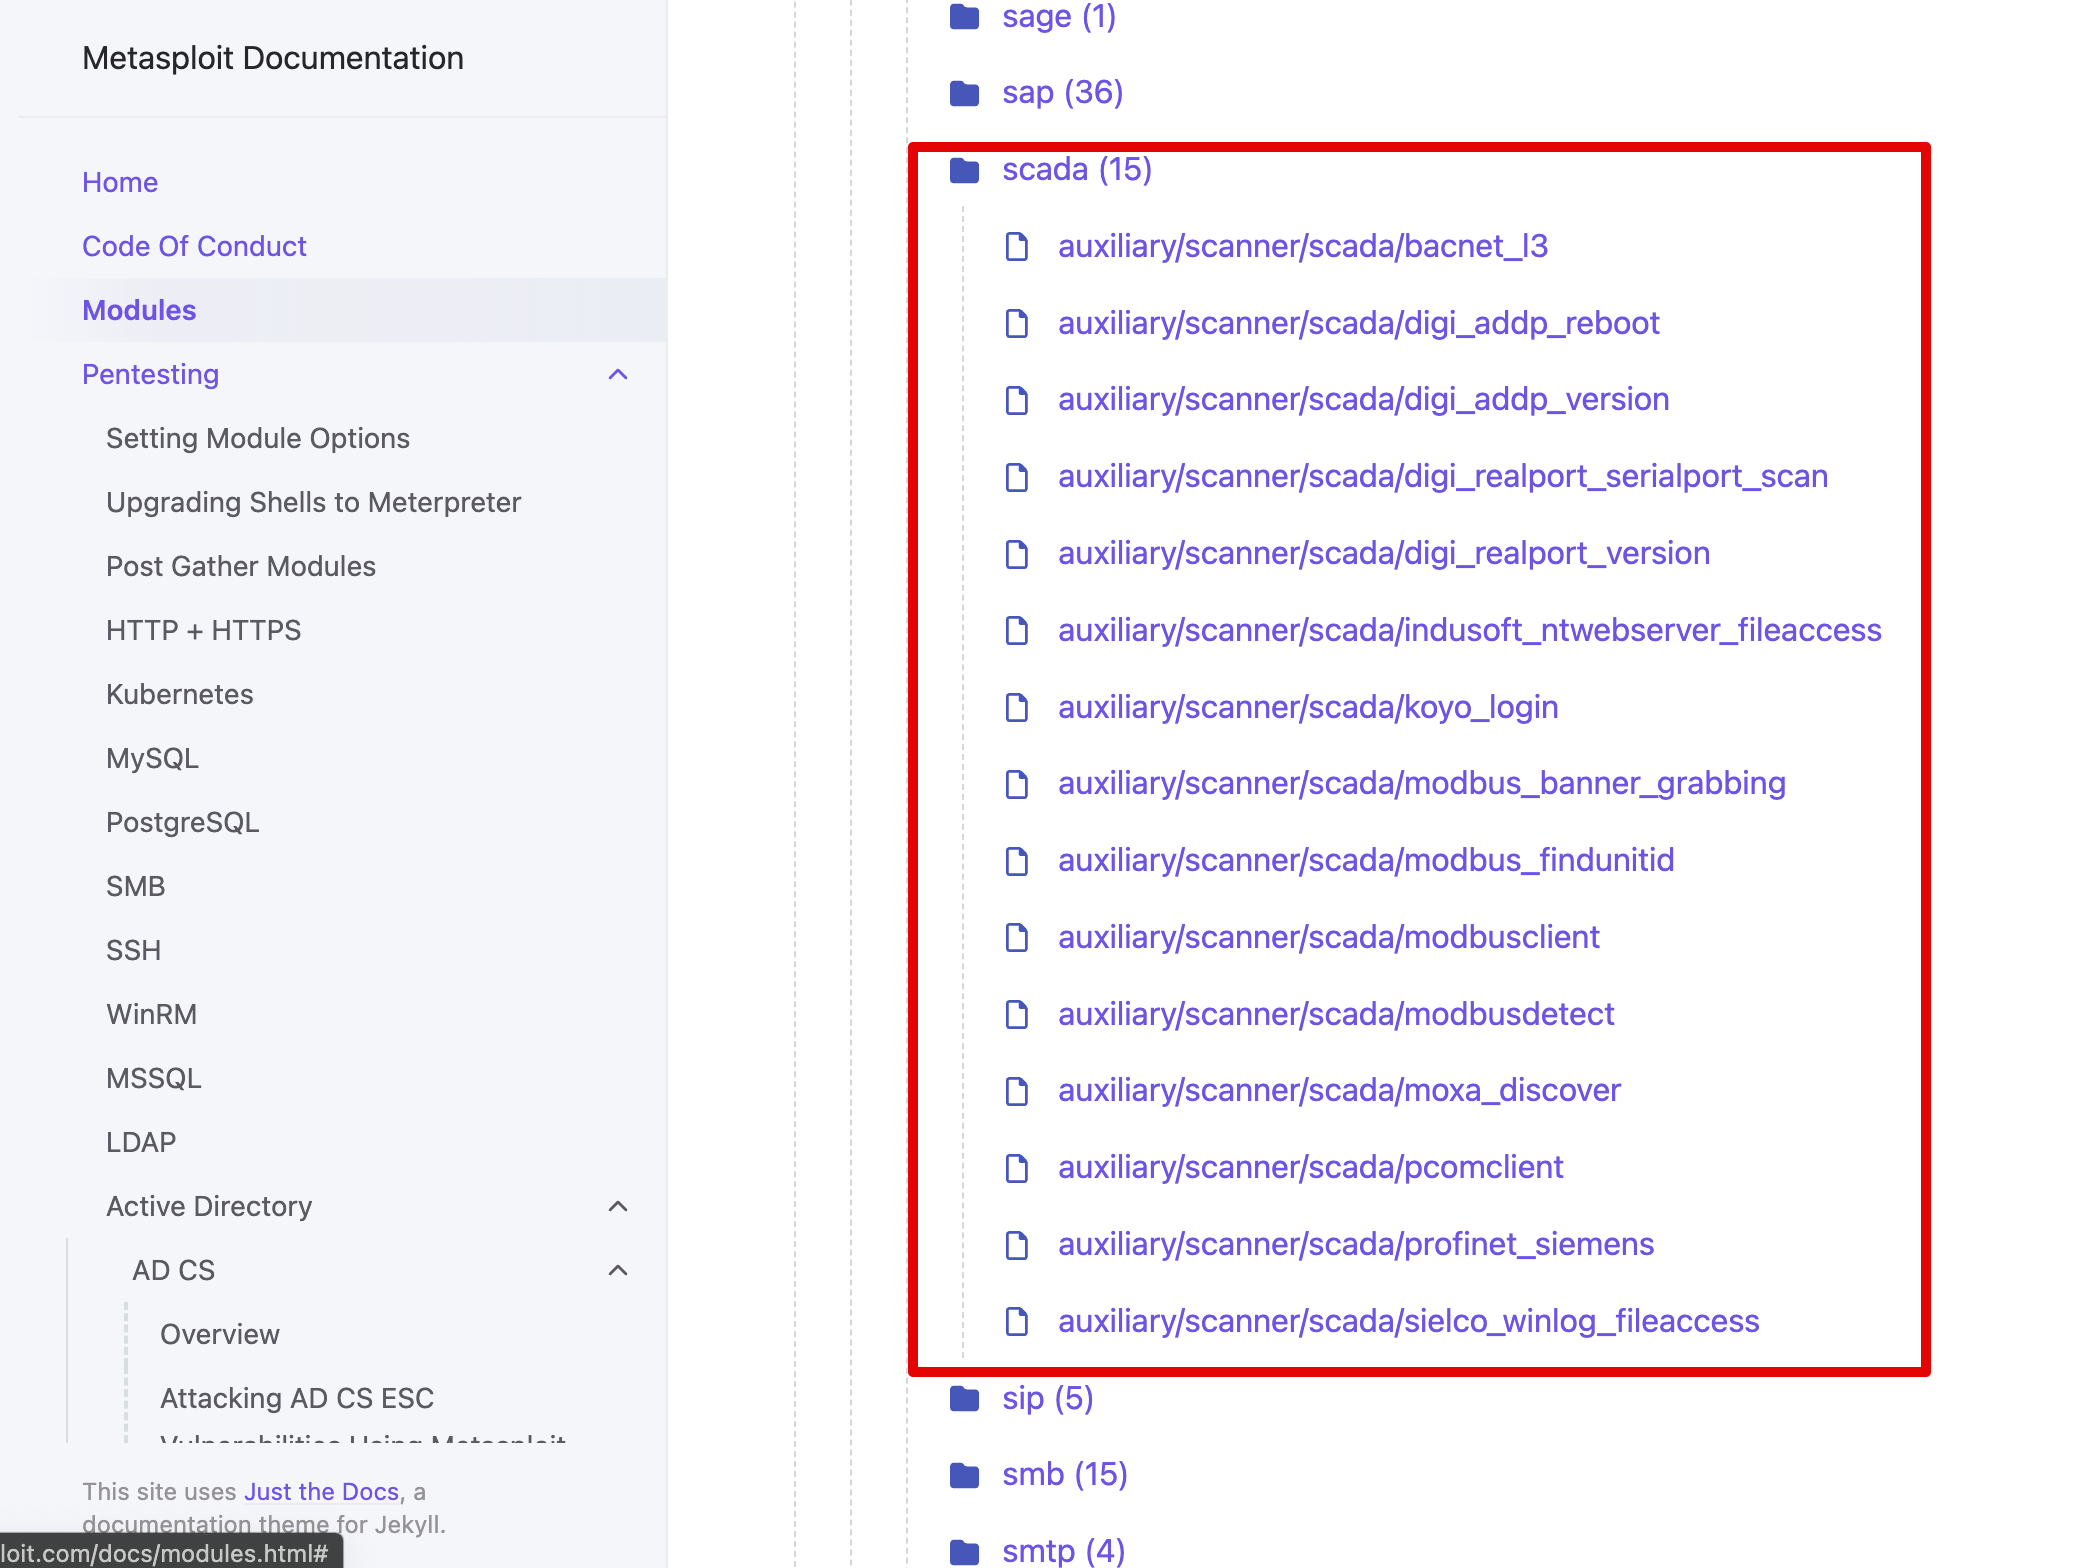
There are a plethora of tools available for scanning OT environment so choose and choose wisely. Nmap or network mapper is probably the leading tool for the job but not be shy to explore other tools like massscan and ICS protocol Metaspoloit modules. You can even create your own scanners using Python libraries like Scapy and Pyshark. Whatever tool you choose, make sure to test them within a lab environment and observe the type of traffic the tool generates on the network. I recommend running your tool against an intended target within your lab and simultaneously run Wireshark or tcpdump to gain a better understanding of the level of scanning traffic your tool generates. You don’t want any surprises when you’re scanning live production systems.
These are the default Metaspolit modules for OT environements:
The Methodology Steps
Identify the types of systems in the environment:
As previously mentioned, I work closely with the POC to understand what systems are in-scope but depending on the type of assessment I’m performing, the customer might desire me to emulate a real adversary as much as possible by discovering devices without assistance. Not to worry, Wireshark is a great tool to give a brief “lay of the land” from wherever I’m positioned within the network.
Note: In switched network environments, Wireshark or any other passive traffic capturing tool can only capture traffic that reaches the network interface it’s attached to. Without techniques like ARP spoofing or port mirroring, you will not see all the traffic in the network. It is most preferred if you capture traffic from an area within the OT network where multiple devices, subnets, and environments converge. This is an example of some areas preferable for capturing traffic (see red arrows):
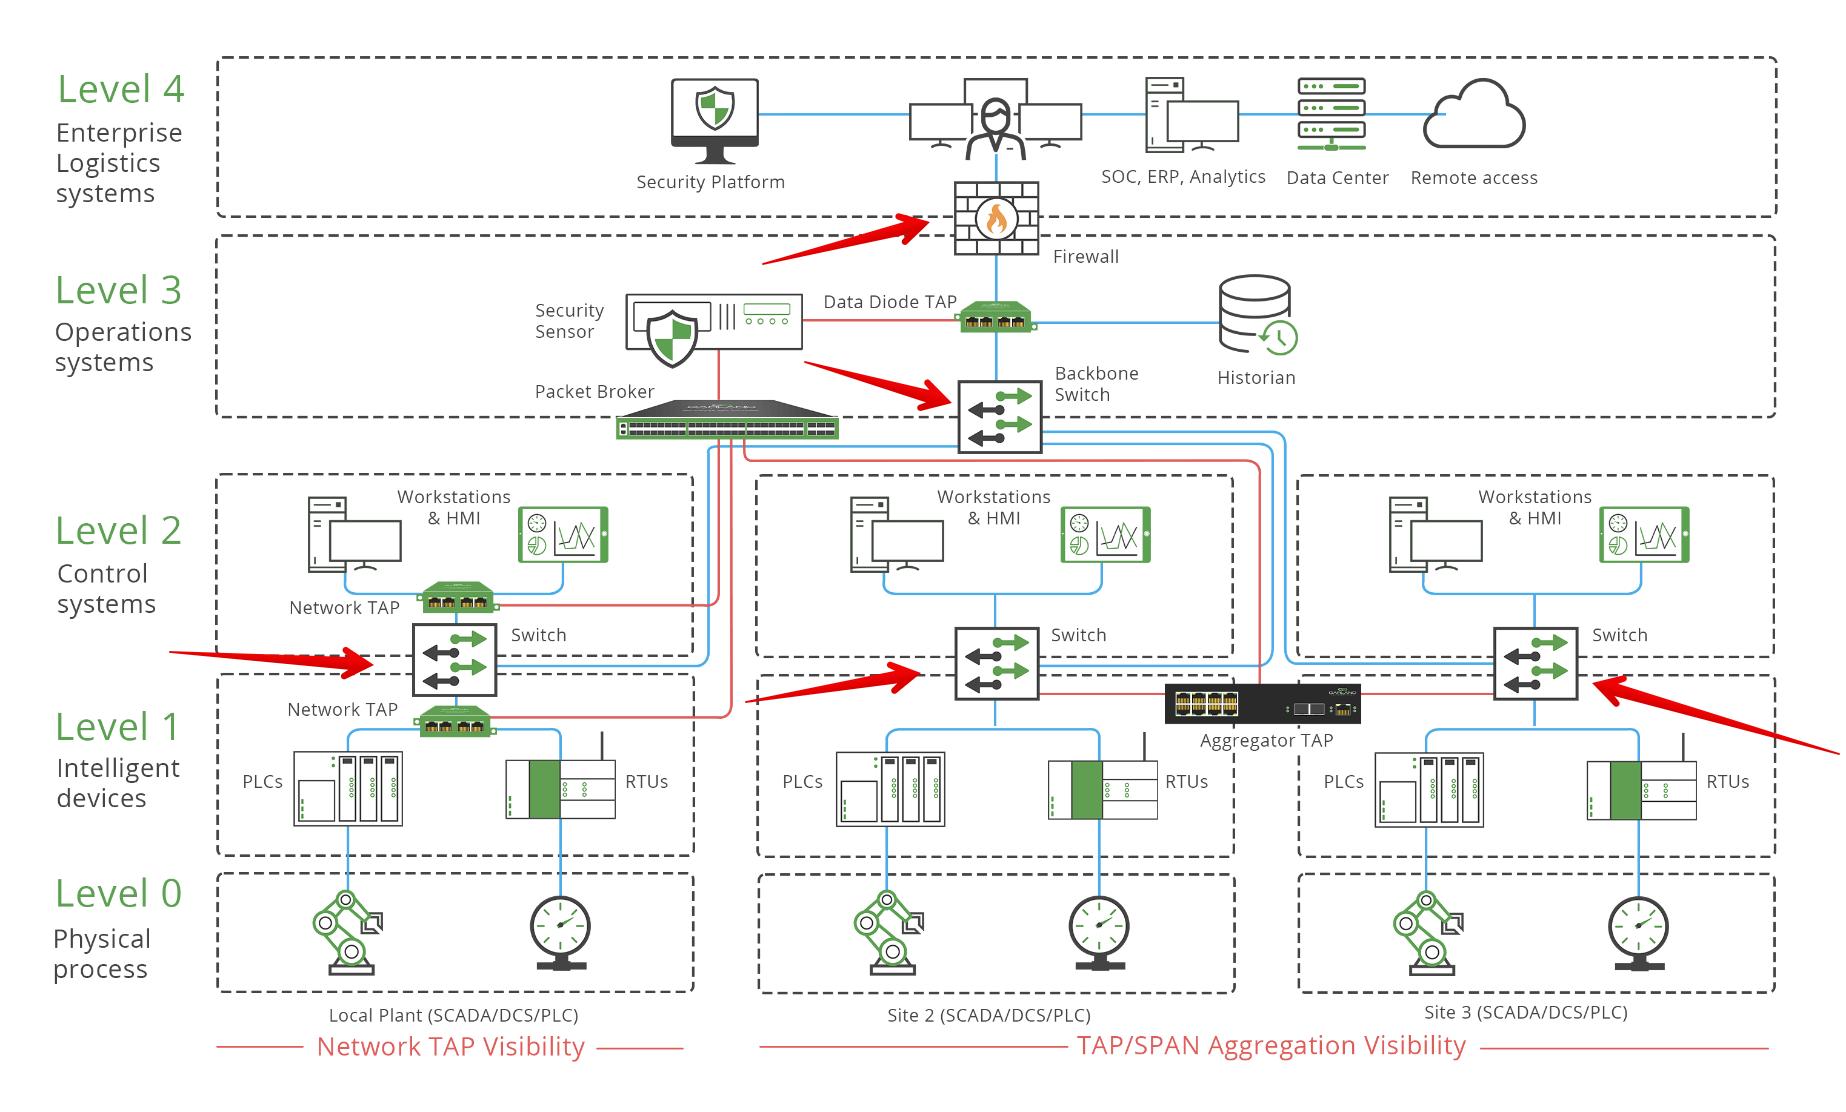
source: https://www.garlandtechnology.com/ot-ics-visibility-solutions-for-industrial
A small Wireshark capture can passively inform me of what hosts are communicating within the target OT network. The network identifiers to assist in me mapping the environment are the following:
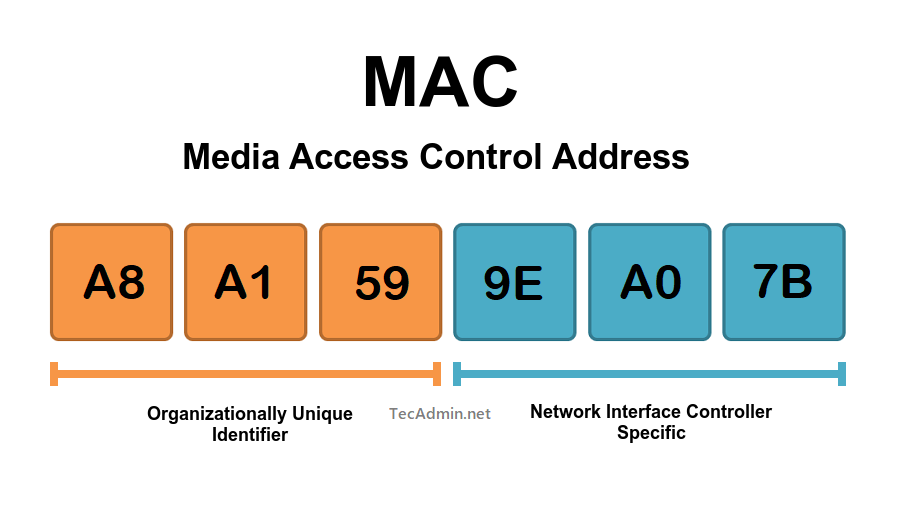
- Media Access Control (MAC) addresses: The portion of the MAC address that identifies the vendor of the network adapter can inform you of the manufacturers of the devices that are communicating within the OT environment. The OUI is the first three bytes of the six-byte field and is administered IEEE. There are many online options for OUI lookups but I recommend this tool by Wireshark during your investigations: Wireshark OUI Lookup Tool
MAC addresses are broken up into these two three-byte portions:
These are several examples of the MAC address OUIs from a Sonic Wall device configuration guide:

- Internet Protocol (IP) addresses: IP addresses are almost self-explainatory. Just like IT laptops and servers, IP addresses are used are assigned to OT assets like Human Machine Interfaces (HMIs), Programmable Logic Controllers (PLCs), and HVAC Data Historians. Acquiring IP addresses from the small packet capture will allow you to understand the host IP address scheme, subnets being used or visible from your position in the network, and the overall size of the network.
Use Wireshark
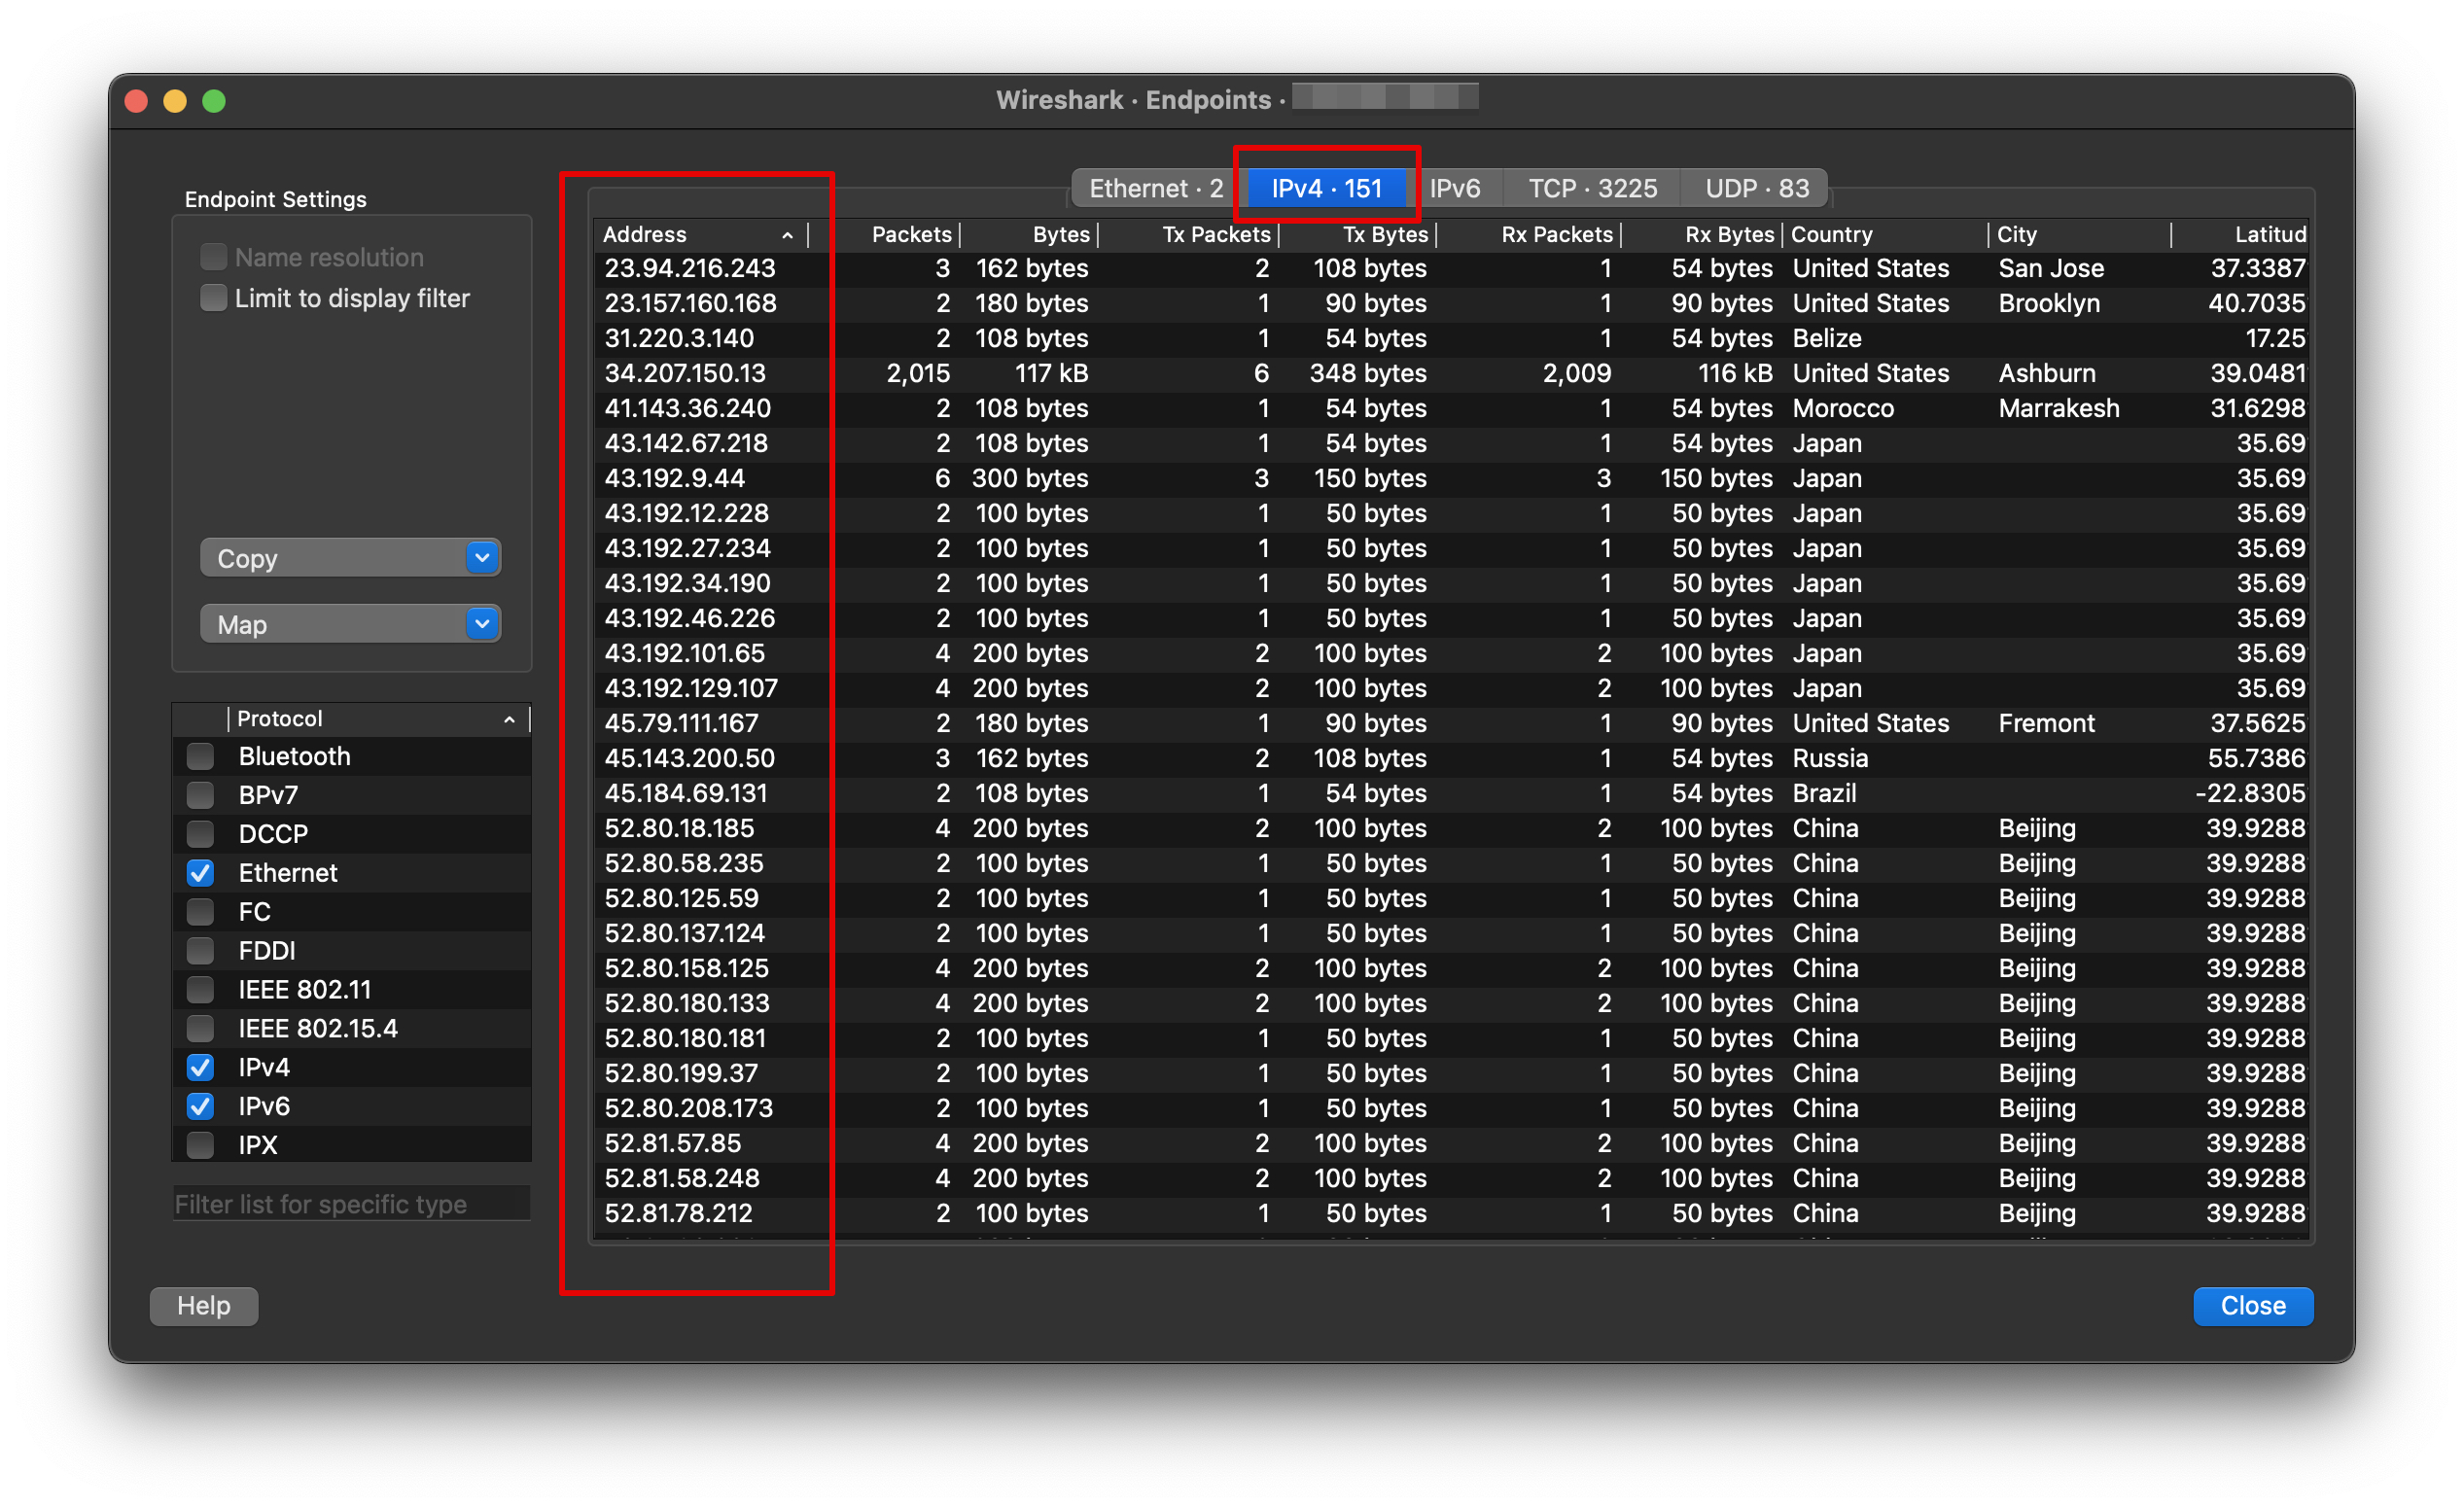
In Wireshark you can find a list of IP addresses with the following steps:
Select Statistics in the Menu bar > Select Endpoints > Navigate to the IPv4 tab
You should see the following:
You could also create simple scripts to fo something similar without having to open Wireshark and wait for the pcap to load to extract the IPs.
Note: Wireshark will run slow when handling pcaps of sizes over 300-400 megabytes.
For ease, I created a Python script that reads a pcap file, extracts IPv4 and IPv6 adresses with regular expressions, and outputs them into a text file. Check it out and modify as you see fit: ip_ripper Python Script
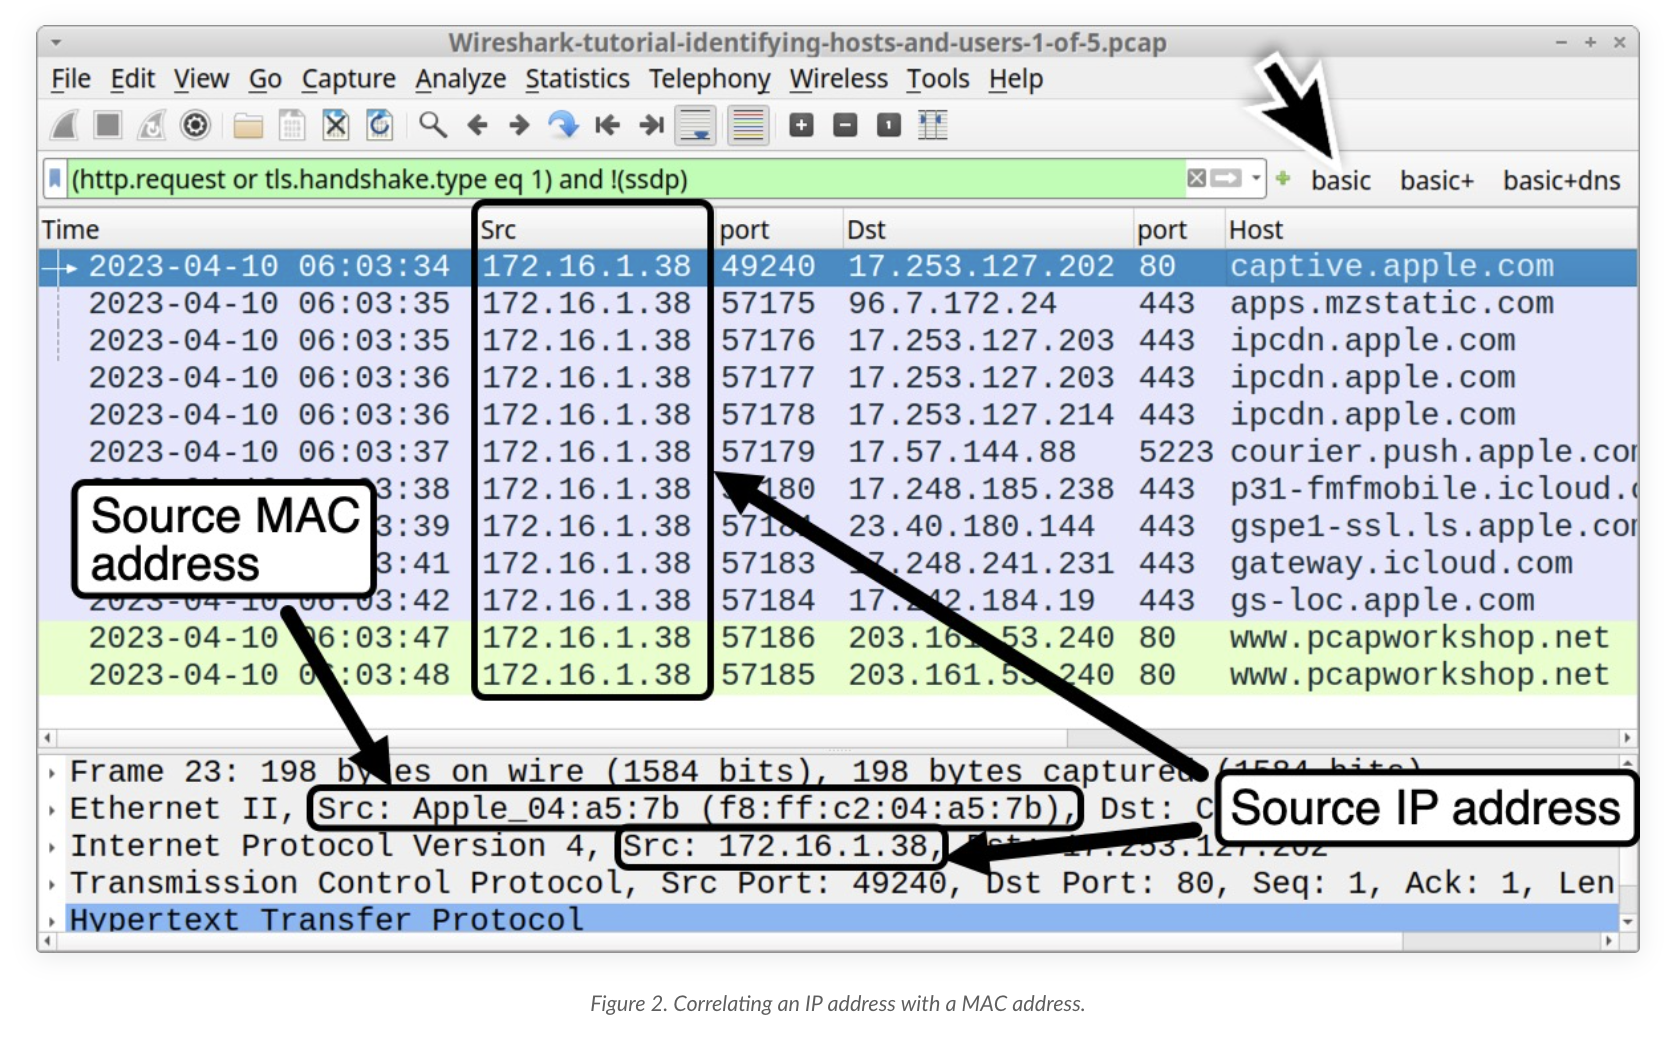
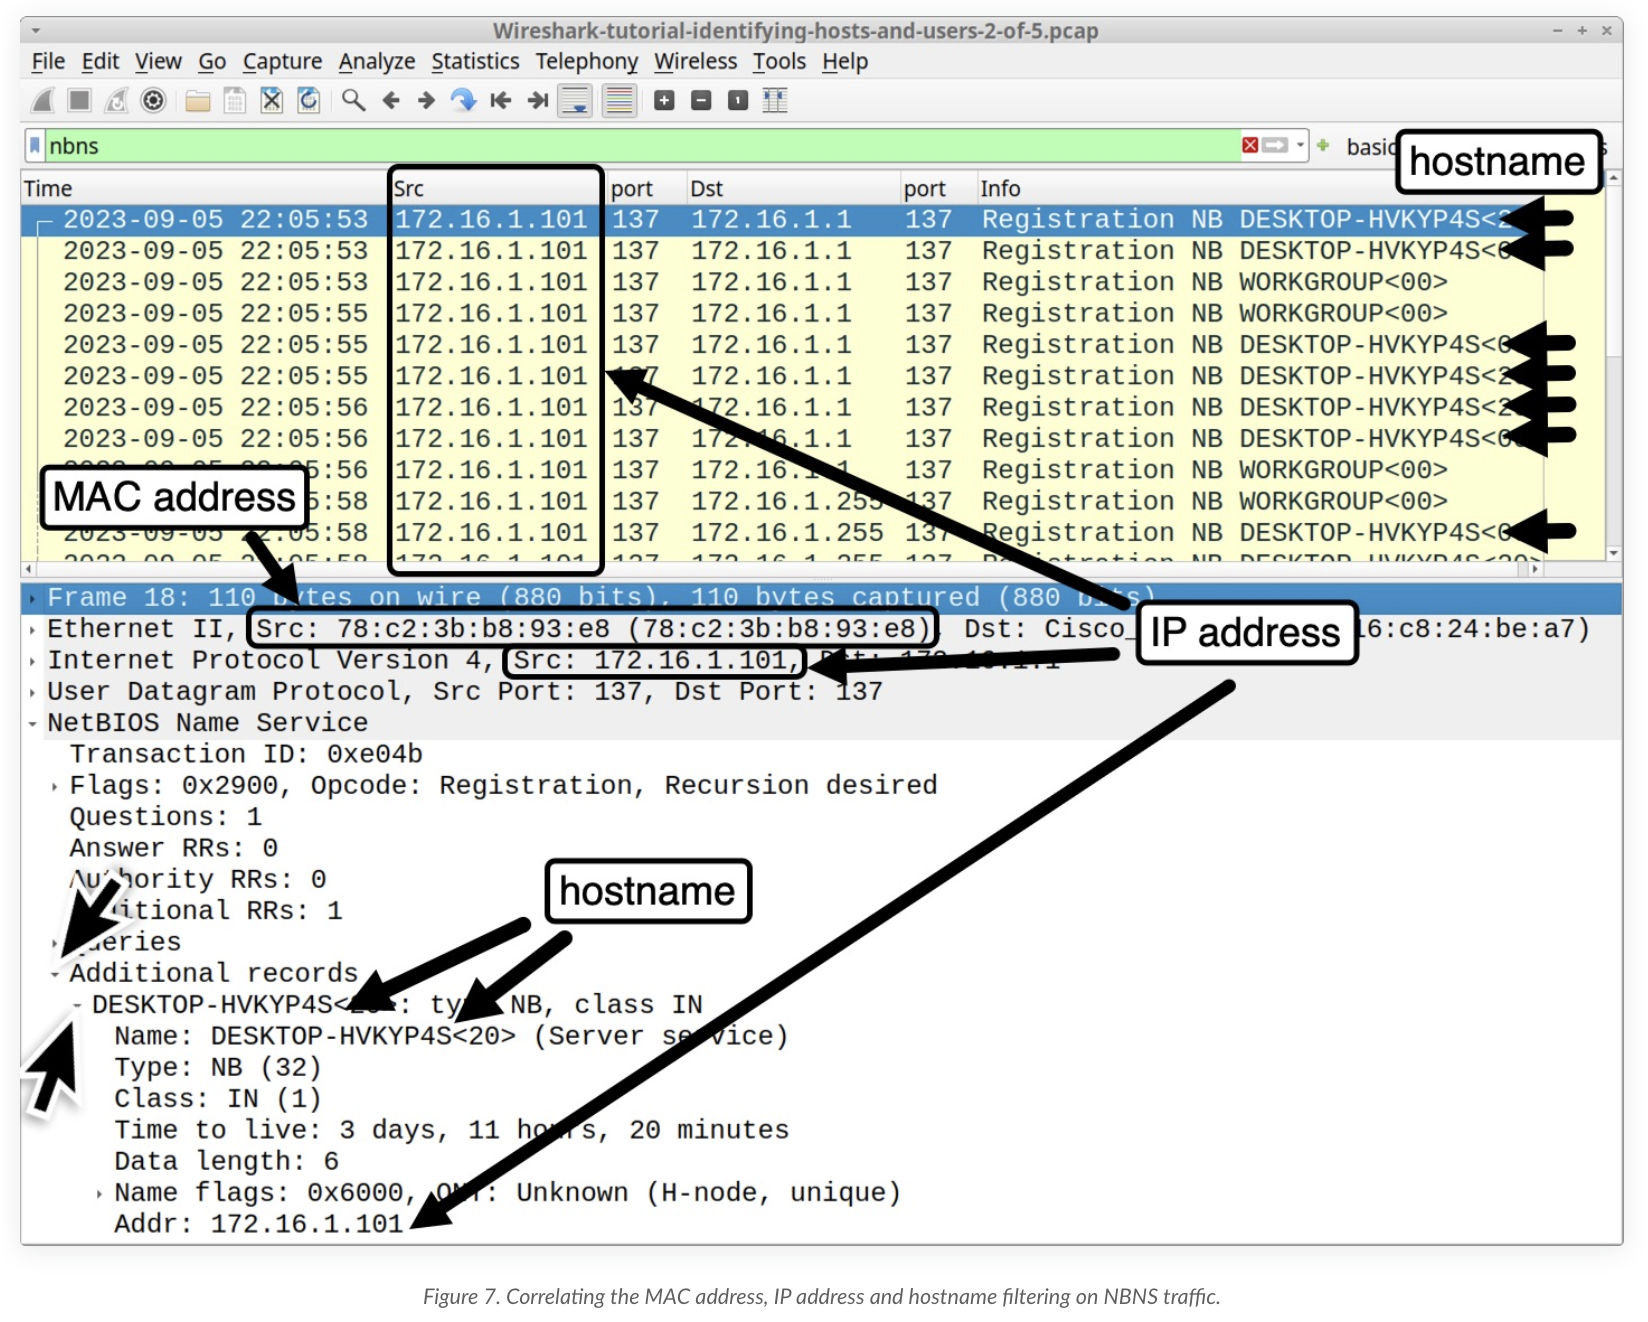
- Hostnames: Depending on the network communication protocol, you can even map IP and MAC addresses directly to host names of machines. DHCP, HTTP(s), Netbios Name Server (NBNS), Kerberos are some of the protocols that offer host identification capabilities within Wireshark. I won’t belabor the explainations of the protocols but I’ll direct you to this Palo Alto Unit 42 blog post for more information here.
Here are some notable screenshots from the blog:
Use Nmap for Discovery
Alternatively, if you don’t want to go through the trouble of the previous steps, you can just utilize the nmap tool to perform an OT device discovery scan of the target network. This is a table of common protocols used in OT environments and the nmap command that scans for the presence of industrial devices.
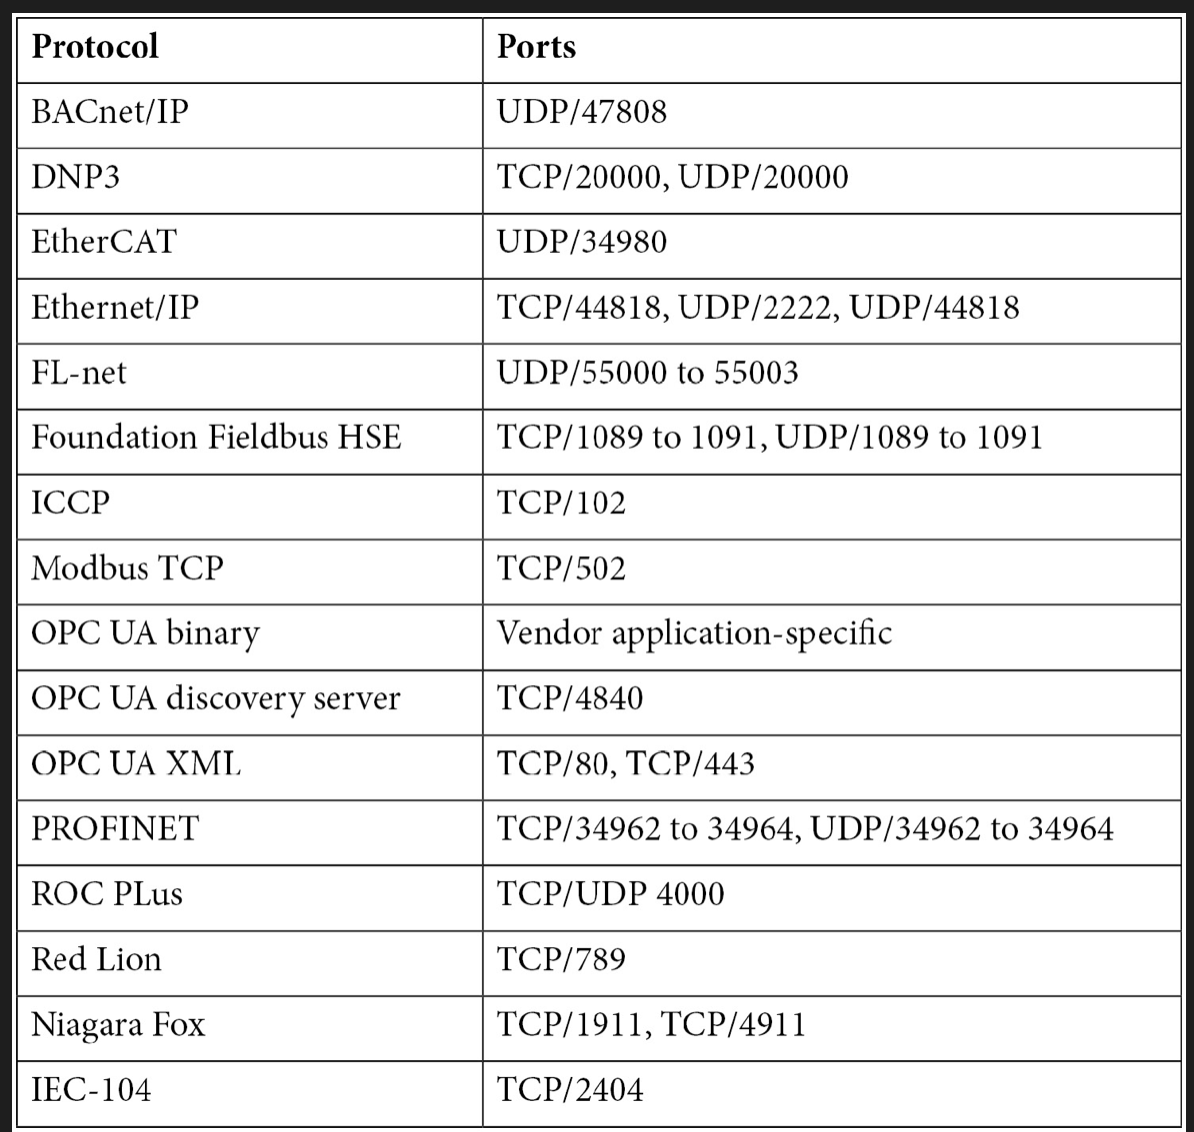
nmap command:
1
nmap -Pn -sT --scan-delay 2s --max-parallelism 1 -T2 - p80,8080,102,443,8443,502,530,593,789,1089-1091,1911,1962,2222,2404,4000,4840,4843,4911,9600,19999,20000,20547,34962-34964,34980,44818,46823,46824,55000-55003 [target]
Here’s a breakdown of each flag in the nmap command:
-Pn: This flag skips the discovery phase. Nmap will not try to determine if the target is online, which is useful if you are scanning a device that blocks ping requests.
-sT: This flag specifies a TCP connect scan. Nmap attempts to establish a connection with each target port. It’s a reliable method but can be easily detected.
–scan-delay 2s: This sets a delay of 2 seconds between probe packets. This slower approach can help evade intrusion detection systems.
–max-parallelism 1: This limits the maximum number of parallel operations (scans) to 1. It’s a way to reduce bandwidth usage and decrease the chance of detection.
-T2: Sets the timing template to “polite” (2 out of 5), which slows down the scan to use less bandwidth and reduce the risk of detection.
-p80,8080,102,443,8443,502,530,593,789,1089-1091,1911,1962,2222,2404,4000,4840,4843,4911,9600,19999,20000,20547,34962-34964,34980,44818,46823,46824,55000-55003: Specifies the ports to scan. This list includes common web ports (like 80 and 443), as well as other ports that might be of interest in an OT environment.
-[target]: This is where you specify the target of your scan, such as an IP address, a range of IP addresses, or a domain name.
Categorizing Assets
Once you’ve identified your devices and confirmed the asset inventory, you should have a conversation with the system owners to understand what you understand about the discovered assets and environments. This process of classifying assets involves identifying and categorizing each discovered device to understand its role, importance, and sensitivity within the network before any scanning activities take place.
You should now have a list of assets that fall into the following device type categories:
Networking devices(switches, routers, industrial controllers, etc.)Workstations(Windows, Linux, Apple, etc.)Servers(SCADA servers, Application servers, Data Historians, Mail servers, Authentication servers, etc.)HMIs(Honeywel Experion, Rockwell PanelView, Emerson Movicon, etc.)PLCs(Siemens Simatic, Schneider Modicon, Rockwell Allen Bradley, Phoenix Contact AXC, etc.)Mobile devices(technician laptops, service tablets, etc.)IoT devices(IP cameras, network-connected printers, smart motion sensors, etc.)Building management systems (BMS)(smart thermostats, fire supressions systems, smart metering, etc.)
Additionally, there needs to be a determination which devices, if compromised, could lead to safety risks or significant operational disruption. This also includes compliance and regulatory considerations and requirementsspecific to the industry, like North American Electric Reliability Corporation Critical Infrastructure Protection (NERC CIP) for the energy sector or Nuclear Energy Institute (NEI) for the commercial nuclear industry.
This is an example of NEI 08-09 “Cyber Security Plan for
Nuclear Power Reactors” rev.6’s guidance on scanning Critical Digital Assets (CDAs) within a US commercial nuclear plant:
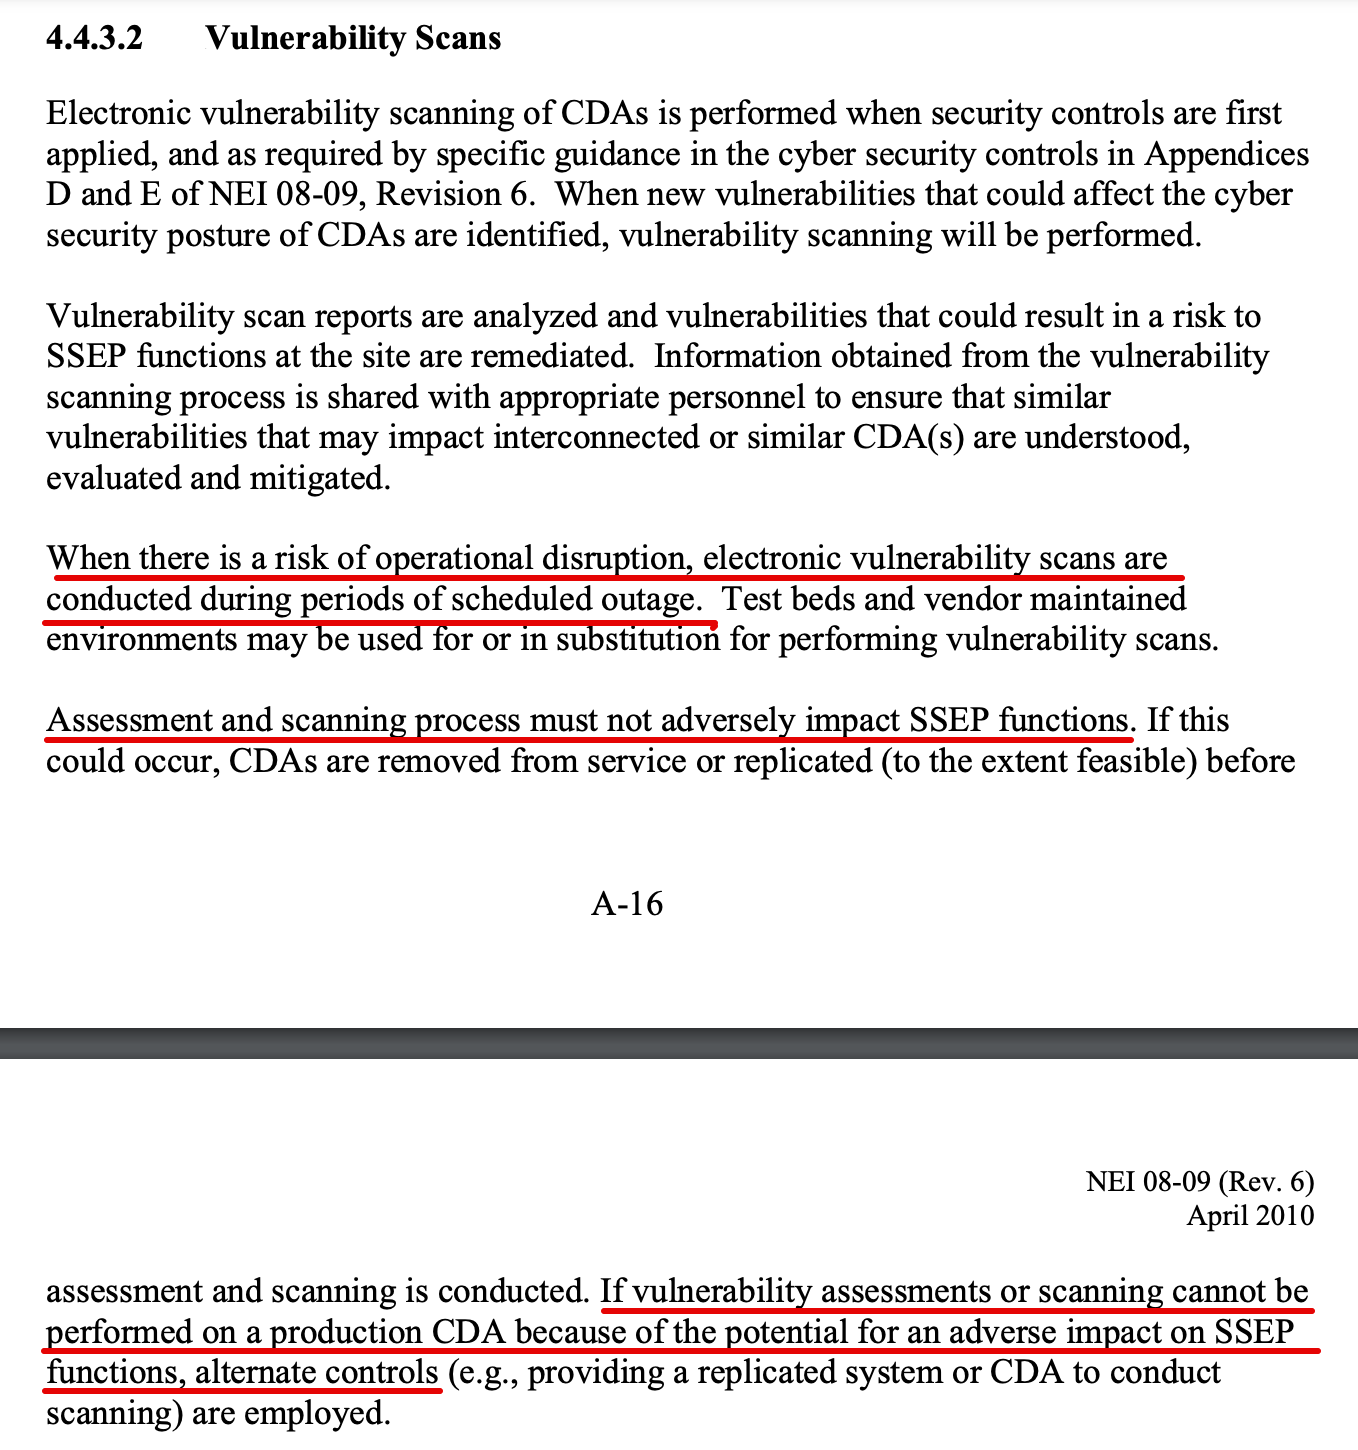
Note: The full document can be found here
The overall goal for this step is to classify the sensitivity of discovered assets, organize into lists (I prefer individual text files) and prepare to create individual scanning profiles for each list.
Scanning with Nmap
In this section, we delve into a technical and tactical methodology for scanning OT assets using Nmap, a powerful and versatile tool in the cybersecurity arsenal.
Given the unique vulnerabilities and critical importance of OT environments it is essential to approach scanning with precision, sensitivity, and an acute awareness of the potential impacts. Much of this section’s recommendations are highly tailorable due to the complexity and diversity of OT environments you might encounter. This methodology is not just about uncovering ports, protocols, services, vulnerabilities and mapping network topologies; it’s about doing so in a way that safeguards the operational integrity and security of these systems.
I aim to guide you through a series of strategic Nmap commands and configurations, each carefully crafted to balance thoroughness with the non-intrusive ethos crucial in these environments.
Preliminary Considerations
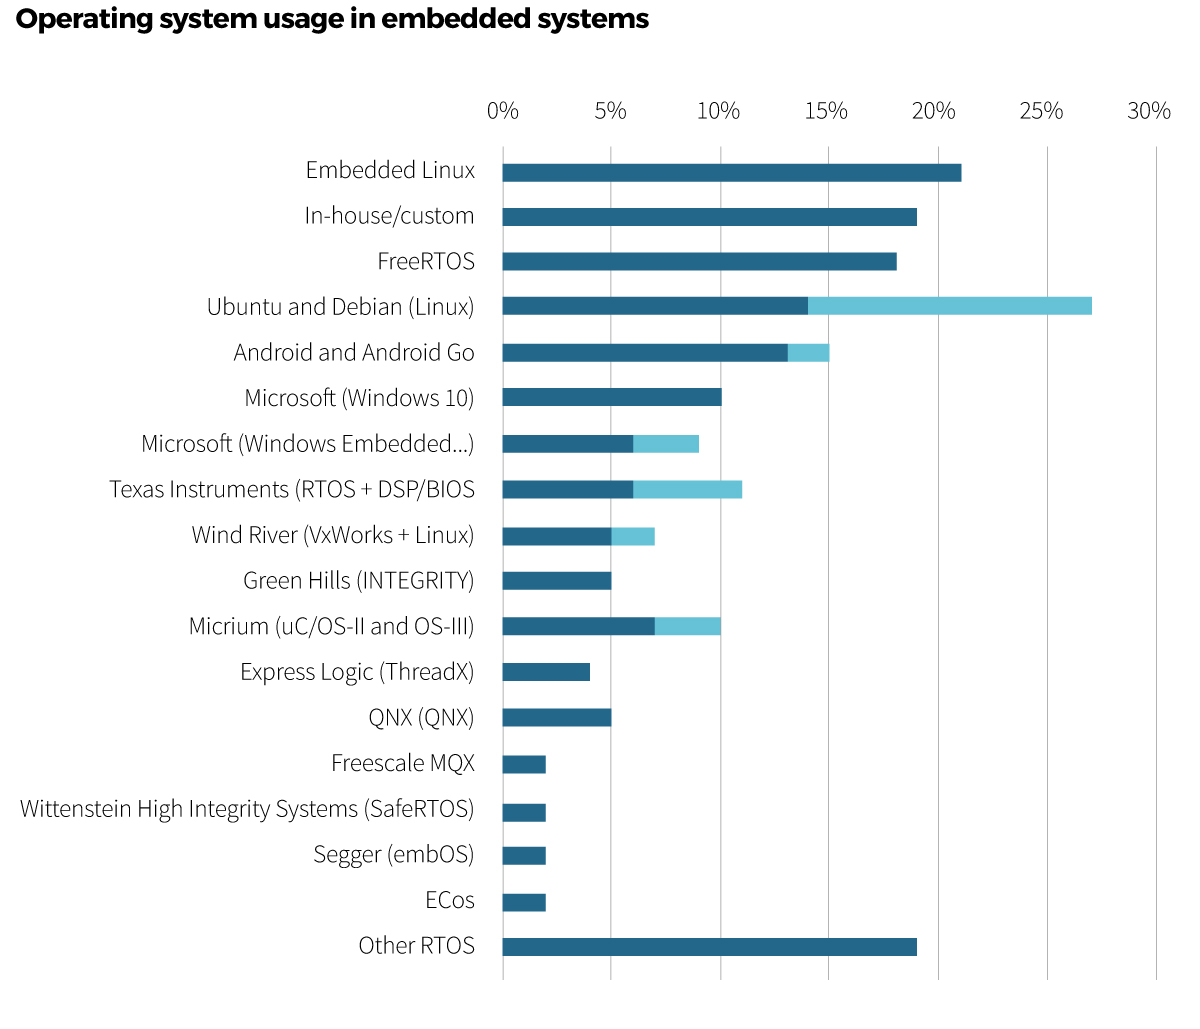
Diverse operating systems
There is a wide range of workstations running in OT environments. Windows XP, Ubuntu, QNX, Windows 2000, Busy Box Linux, Windows 7, Windows CE, Windows 10, FreeRTOS, and the list goes on:
The applications running on each system will vary but ports, protocols, and services for communications are areas that all of these OSs have in common and can be interrogated usinsg the Nmap tool.
Flags to avoid recommendations
When scanning OT devices, certain Nmap flags should be avoided or used with caution due to the potential risks they pose. Here’s a list of such flags with explanations:
a. Aggressive Detection Flags (-A / -O):
Explanation: The -A flag enables OS detection, version detection, script scanning, and traceroute. The -O flag is specifically for OS detection. These features can generate traffic patterns or probes that might be disruptive or interpreted as intrusive by sensitive devices, potentially causing them to crash or malfunction.
Recommendation: Avoid using these flags, or use them only in a controlled environment where the risk is understood and acceptable.
b. SYN Scan (-sS):
Explanation: SYN scans are less intrusive than full TCP connections, but they can still be problematic for devices with limited or non-standard TCP/IP stacks like PLCs and embedded OSs. These scans are not proper RFC behavior, so only mature TCP/IP stacks handle them properly. A large amount of half open TCP SYN packets have the potential to consume the computational power of purpose-built OT devices and cause system failure.
This is a visual representation of a SYN scan targeting a Server’s TCP port 22 which never establishes a full TCP connection but interrogates for responses:
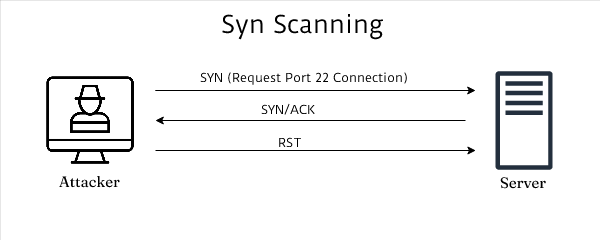
Recommendation: Use the -sT (TCP connect scan) instead, which is less likely to cause issues on sensitive devices as it completes the TCP handshake process.
c. UDP Scan (-sU):
Explanation: UDP scanning can be particularly disruptive because it often results in sending empty or malformed packets to UDP ports. Many devices do not handle these types of packets gracefully, potentially leading to crashes or unexpected behavior.
Recommendation: Limit UDP scans to specific known-safe ports, or avoid them entirely in highly sensitive environments.
d. Fast Scan Options (-T4 / -T5):
Explanation: The -T flag affects the speed of the Nmap scanning tool. Higher timing options (-T4 for aggressive and -T5 for insane) increase the speed of the scan, which can overwhelm sensitive devices. These options can cause a large number of packets to be sent in a short period, leading to network congestion or device overload.
Recommendation: Use lower timing options like -T1 (sneaky) and -T2 (polite) to reduce the scan aggressiveness. These scan options will take longer than normal but are less likely to overburden OT devices.
e. Using Arbitrary Script Scanning (--script):
Explanation: Nmap’s Scripting Engine (NSE) can execute a wide range of scripts, some of which might be intrusive or inappropriate for sensitive environments. Scripts can perform actions or generate traffic that could disrupt operations.
Recommendation: Only use scripts that are known to be safe and relevant for the target environment. Scripts categorized as safe and discovery are usually a better choice for OT networks.
A great resource that I have used during engagements is Digital Bond’s ICS Enumeration Tools that contains a plethora of Nmap NSE scripts that are safe for OT environments. Check out the project on GitHub here
f. Service Version Detection (-sV):
Explanation: While service version detection is generally safer than some other methods, it can still pose risks. This flag probes services to determine the software version, which can occasionally trigger unintended responses in some services.
Recommendation: Use this flag selectively and possibly with lowered version intensity using --version-intensity to limit the intrusiveness of the probes.
g. Default Nmap scan (nmap with no flags):
Explanation: When Nmap is run without any flags (nmap <target subnet or host>), it performs two different activities;
Ports Scanning and Host Discovery. Here is a breakdown of the default packets sent by Nmap:
- Port Scanning Behavior:
For Root Users: Nmap performs a SYN scan, sending TCP SYN packets to various ports on the target host(s). This is used to determine the status of ports without completing a full TCP connection.
For Non-Root Users: Nmap performs a connect scan, which involves completing the TCP three-way handshake (SYN, SYN-ACK, ACK) with the target host’s ports.
- Host Discovery Behavior:
Default Host Discovery: Regardless of user privileges (root or non-root), if no specific host discovery options are specified, Nmap uses a default set of techniques to determine which hosts are active before it proceeds to the port scanning phase. This network traffic includes:
Sending an ICMP Echo Request (type 8, or “ping”) to the target.
Sending a TCP SYN packet to port 443 (HTTPS port).
Sending a TCP ACK packet to port 80 (HTTP port).
Sending an ICMP timestamp request.
When you run Nmap without any flags, it first performs the default host discovery process and then proceeds to the default port scanning method (SYN scan for root users, connect scan for non-root users).
Recommendation: Don’t run nmap with no flags because by default, it sends traffic that have the potential to disrupt OT devices. No flags does not equate to no traffic. It’s not revolutionary but knowing what traffic you’re sending to targets is important to tuning your scanning strategy.
BMS/BAS Nmap Scanning Example
In this section, we will explore the nuances of scanning Building Management Systems (BMS) and Building Automation Systems (BAS) using Nmap, with a focus on a pre-defined list of hosts from the discovery phase.
BMS/BAS fall into the category of OT systems because they directly control physical operations within modern buildings, such as HVAC (heating, ventilation, and air conditioning), lighting, power systems, fire systems, and physical security systems.

This scanning approach will be tailored to minimize potential disruptions while maximizing the insights gained from the scan. Armed with a list of specific IP addresses, we bypass the initial discovery phase, directing our efforts towards more targeted and efficient scans.
Here are the steps:
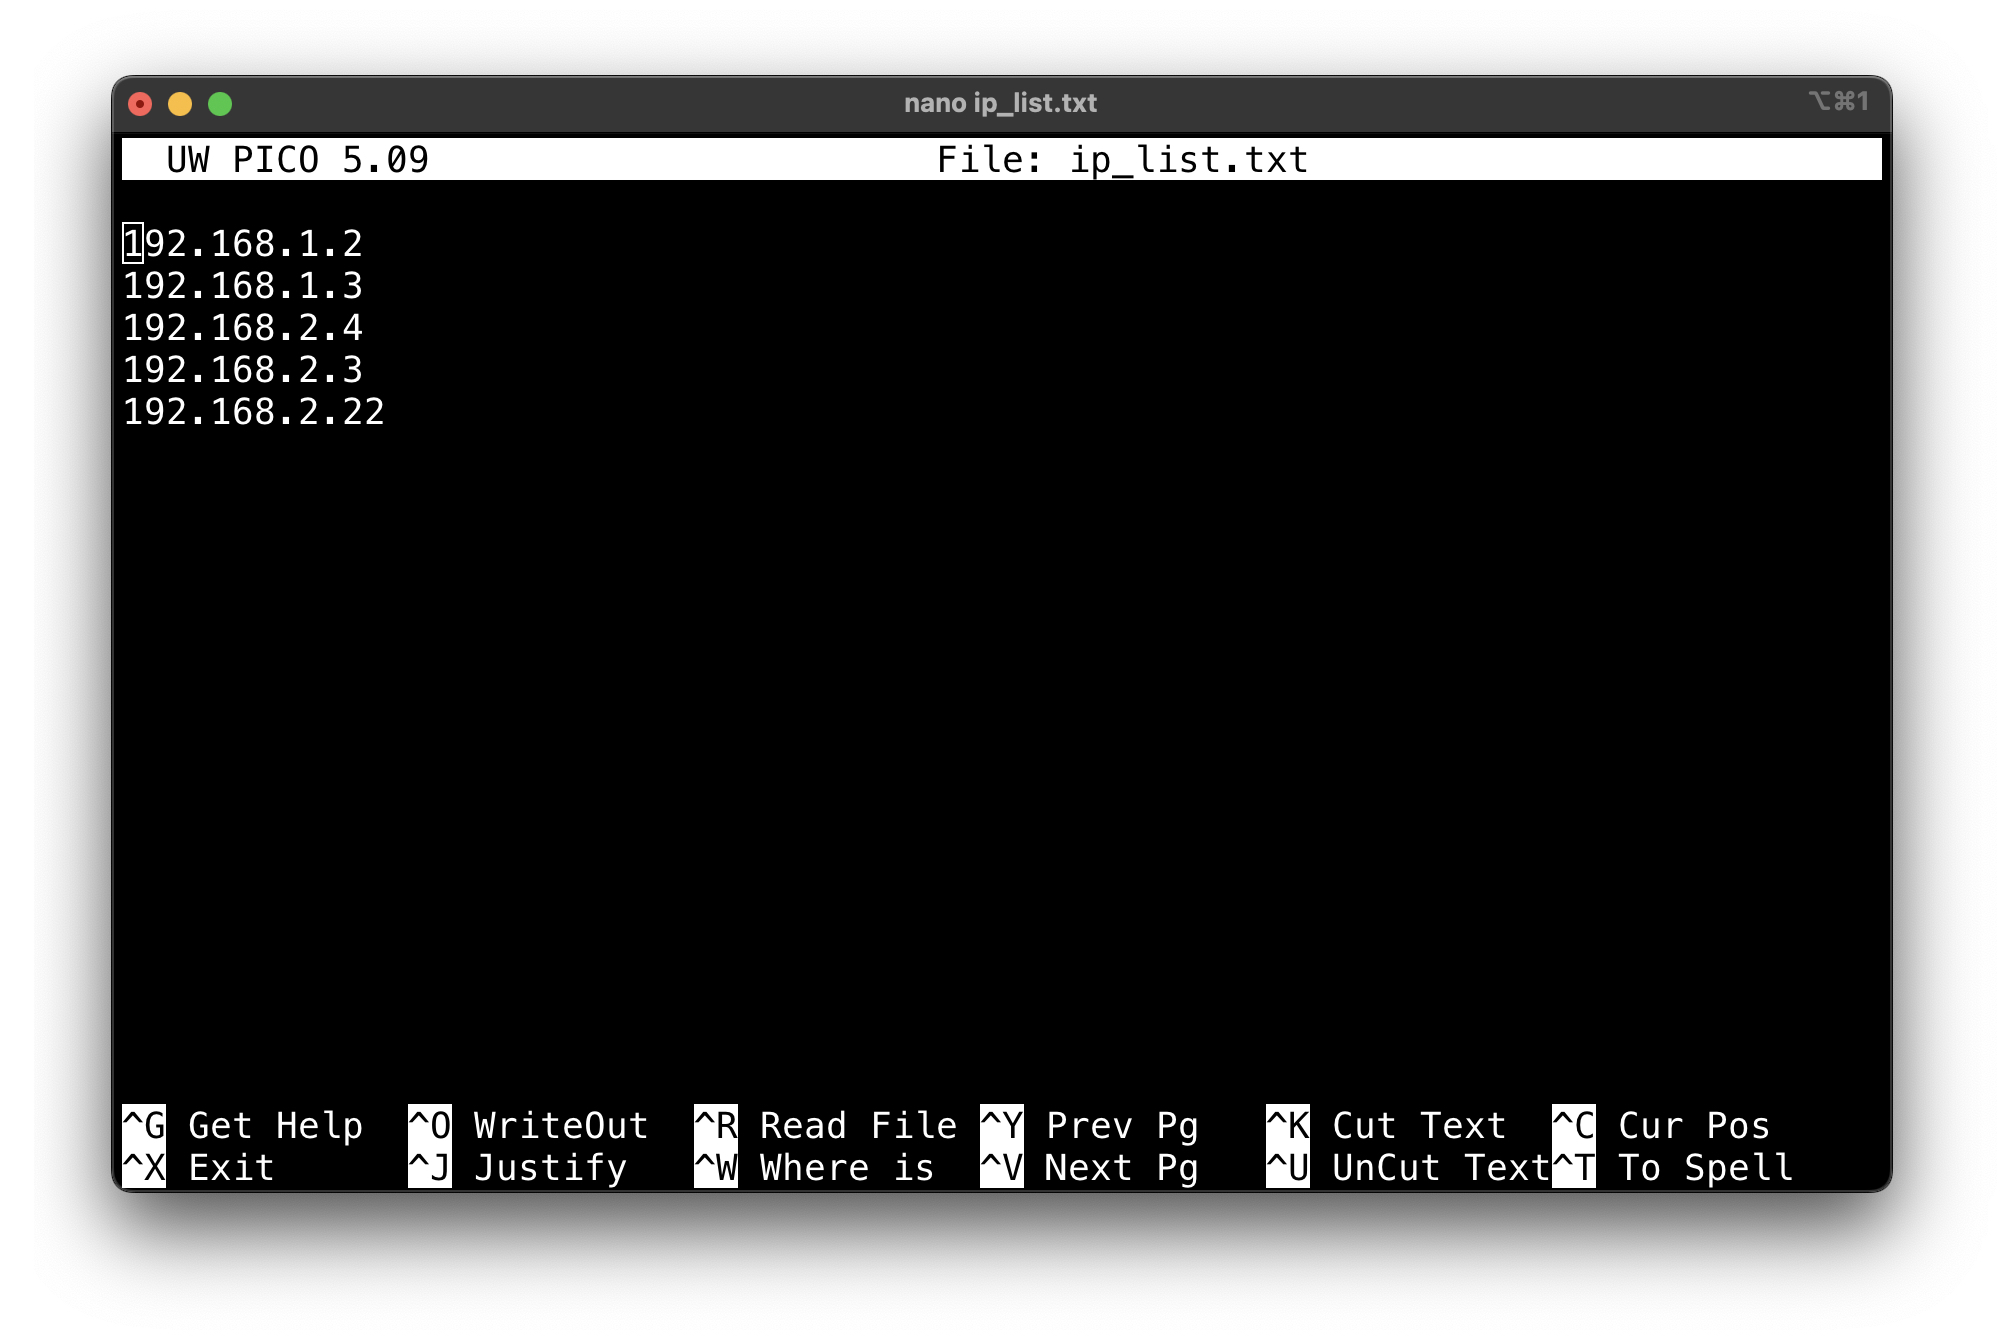
- Create a text file (e.g.,
ip_list.txt) with one IP address per line:
1
2
3
4
5
6
192.168.1.2
192.168.1.3
192.168.2.4
192.168.2.3
192.168.2.22
... and so on ...
Note: If you’re using a Linux or Unix terminal, feel free to use the
touchtool to create the file (touch ip_list.txt) and your favorite text editor to add your IP addresses to the new file. I to usenanoas my go-to text editor:
- Run Nmap with the
-iLoption followed by the filename with other scan options:
1
nmap -iL ip_list.txt [other scan options]
- Specify communication protocols being used for the specified OT environment. Building Management Systems (BMS) and Building Automation Systems (BAS) use a variety of TCP/IP and UDP protocols to manage and control various building functions. These protocols are often specific to the automation and control industry.
This is a list of BMS/BAS TCP/IP and UDP protocols (you will use these protocols in your scanning profile):
Note: I will reference tcp or udp and ports as
tcp or udp / port numbers
a. BACnet (Building Automation and Control Networks):
Protocol Type/Ports: Primarily UDP, but can operate over TCP (
udp/47808andtcp/47808)Usage: Widely used for communication in building automation and control systems, including HVAC, lighting control, and other building systems.
b. Modbus:
Protocol Type/Ports: TCP (Modbus TCP) and serial communication (Modbus RTU), (
tcp/502)Usage: Common in industrial environments for connecting industrial electronic devices. In BMS/BAS, it’s used for device communication and control.
c. LonWorks (Local Operating Network):
Protocol Type/Ports: Primarily a networking platform based on a protocol created by Echelon Corporation, can run over TCP/IP. (
tcp/2540)Usage: Used for building automation applications, controlling and monitoring various systems.
d. Niagara Framework (Tridium / Fox Protocol):
Protocol Type/Ports: TCP (
tcp/1911andtcp/4911)Usage: A framework primarily used for integration, control, and monitoring of automation systems, including BMS and BAS.
e. KNX (Konnex):
Protocol Type/Ports: Can operate over TCP/IP, as well as other communication mediums like RF and serial. (
tcp/3671andudp/3671)Usage: A standard for home and building control, covering areas like lighting, blinds, security systems, energy management, etc.
f. OPC (OLE for Process Control):
Protocol Type/Ports: TCP (
tcp/135is a common port for OPC DA (Data Access) and OPC UA (Unified Architecture) commonly usestcp/4840)Usage: Used in industrial automation and BMS for communicating real-time plant data between control devices from different manufacturers.
g. SNMP (Simple Network Management Protocol):
Protocol Type/Ports: UDP (
udp/161for SNMP agent listening andudp/162for SNMP Trap.)Usage: Although more common in IT environments, SNMP is commonly used in BMS/BAS for monitoring and managing networked devices.
Each of these protocols serves specific functions within BMS/BAS environments, and they often coexist within the same system, ensuring comprehensive control and monitoring capabilities.
Additionally, in your curated list of assets, you will have IP cameras, HVAC devices like controllers and control panels that not only uses BMS/BAS protocols, but also common IT protocols and services.
Most IP cameras use HTTP or HTTPS for management of the devices so you would want to add tcp/80,tcp/443, tcp/8080, and any potential variations of web access protocols.
4.BMS/BAS Discovery scan (tcp protocols only):
1
nmap -Pn -sT -p 502, 2540, 1911, 4911, 135, 4840 --scan-delay 2s --max-parallelism 1 -T3 -iL ip_list.txt
-Pn: This flag tells
nmapto skip the discovery phase. Normally,nmapstarts with a discovery phase to determine which hosts are online before scanning them. However, with-Pn,nmapassumes that the target hosts are online and directly starts scanning them. This is useful in situations where the host may not respond to ping requests (ICMP), which is often used for discovery.-p 502, 2540, 1911, 4911, 135, 4840: This flag specifies the port number to scan and aligns with the previously mentioned BMS/BAS protocols. Without this,
nmapwould scan its default set of most common ports.–scan-delay 2s: This flag is used to set a delay between individual probe packets sent by
nmap. In this case,--scan-delay 2sspecifies a delay of 2 seconds between each packet. This can be useful to slow down the scan to avoid detection by intrusion detection systems (IDS) or to reduce the network load and disruptions. It’s a way to make the scan less aggressive and more stealthy.–max-parallelism 1: Setting
--max-parallelism 1means thatnmapwill only perform one operation at a time, in this case, port scanning. It is useful in sensitive network environments where too many parallel scans might disrupt network services or trigger security alarms.-T2: The
-T2flag innmapis used to set the timing template for the scan to a level described as “polite.” This timing option is slower than the default-T3setting.
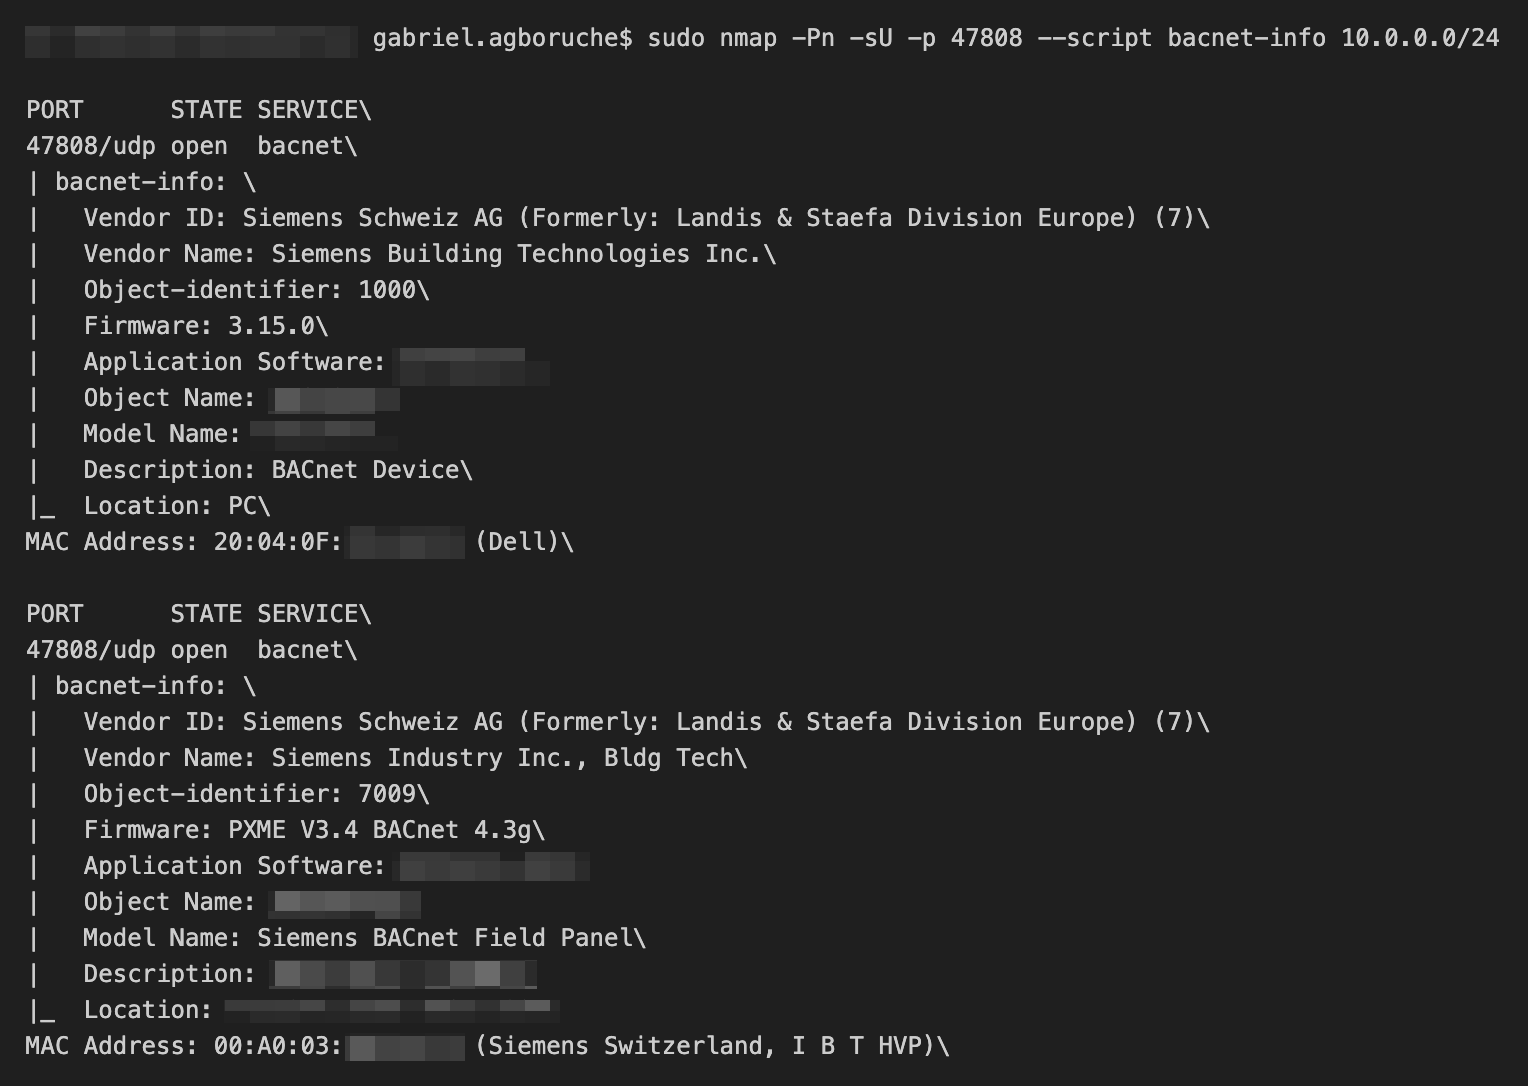
5.Suggested nmap command for BACnet protocol scan:
1
nmap -Pn -sU -p 47808 --script bacnet-info -iL ip_list.txt
This is an explanation of each element of the scan:
-sU: This specifies thatnmapshould perform a UDP scan. By default,nmapperforms a TCP scan. UDP scanning is generally slower and more complex because UDP (User Datagram Protocol) is a connectionless protocol and does not respond with a clear acknowledgement as TCP does.-p 47808: This flag specifies the port number to scan. In this case,nmapis instructed to scan only port 47808.--script bacnet-info: This invokes thebacnet-infoNSE script that is used to gather information from devices that use the BACnet protocol. This script tries to gather information like Vendor ID, Firmware Revision, Application Software Revision, Object Name, and more from the BACnet devices.-iL ip_list.txt: This tellsnmapto read the list of target hosts from the fileip_list.txt. This is a way to scan multiple targets; the file should contain one IP address or hostname per line.
This is an example of the output from this nmap command that uses the NSE script (information from this scan is redacted because this scan comes from an actual assessment I preformed during a security assessment, this is real output data):
6.Identify additional critical devices. HMIs and BBMDs are critical components in managing building systems and they can be attractive targets for cyber attacks. Scanning can reveal vulnerabilities, outdated firmware, or insecure configurations that could be exploited.
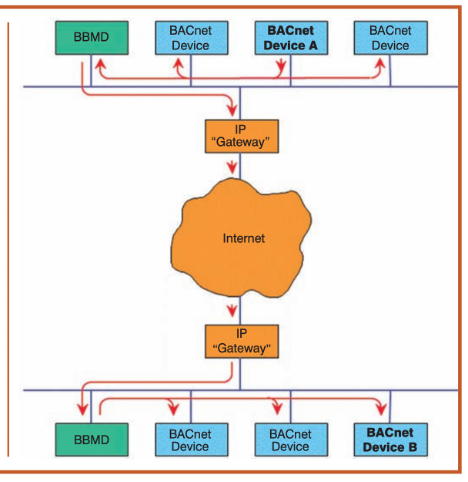
- BBMDs: BACNet Broadcast Management Devices (BBMD) devices are commonly internet-connected devices that act as a remote bridge into an untrusted environment (internet) into sensitive BACNet networks. Because these devices give connectivity into BACNet networks, these devices presents organizations with an attractive attack vector to secure.
The BBMD operation is actually quite simple. Each BBMD has a “Broadcast Distribution Table” (BDT) containing a list of its peers. If you gain access the BBMD, you have access to all of the BACnet devices that it is connected to:
If I’m scanning BBMDs, I’ll use the same previously-mentioned BACnet device scanning profile with additions of HTTP and HTTPS because these devices tend to have web ports open:
1
nmap -Pn -sU -sT -p T:80,T:443,U:47808 --script bacnet-info,http-title,ssl-cert -iL ip_list.txt
-sU, -sT: This combination tells Nmap to perform both UDP (-sU) and TCP (-sT) scans.-p T:80,T:443,U:47808: T:80,T:443 specifies that Nmap should scan TCP ports 80 (HTTP) and 443 (HTTPS) and U:47808 specifies that Nmap should scan UDP port 47808, commonly used by BACnet.--script bacnet-info,http-title,ssl-cert:bacnet-infoscript for gathering information from BACnet devices.http-titlescript for getting the title of web pages on HTTP servers.ssl-certscript for retrieving SSL certificate details from HTTPS servers.-iL ip_list.txt: Instructs Nmap to read the list of targets from the provided file,ip_list.txt.
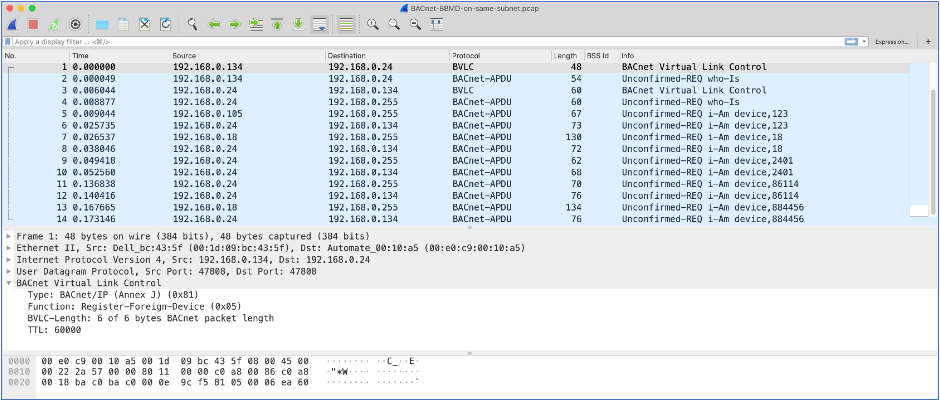
Additionally, BBMDs connects to other BACnet devices within a network. To identify these devices, I would look for BACnet devices with multiple network connections to others hosts within a network. I would also use Wiresharkto evaluate BACnet network traffic to identify BACnet Virtual Link Control (BLVC) traffic which identifies BBMD devices.
In this instance, the BBMD is the host with IP address 192.168.0.24:
- HMIs: HMIs commonly use stripped down and purpose-built Windows operating systems when deployed in industrial environments. These devices can alert facility managers to abnormal conditions or malfunctions, display alarm notifications, and guide users through troubleshooting steps or necessary actions such as fire alarm and fire suppression actions for facility managers.
HMIs can be attractive to threat actors because they offer control, access to information, sometimes weaker security, potential for causing disruption, and pathways to other parts of the network.
ABB offers has a suite of HMI products:

Because HMIs are typically Windows devices that communicate BACnet and could possibly be managed within a Windows Active Directory (AD) environment, a potential nmap command would look like the following:
1
nmap -Pn -sU -sT -p U:47808,T:135,T:139,T:445,T:3389,T:53 --script smb-enum-shares,smb-enum-users,smb-os-discovery,msrpc-enum,rpcinfo -iL ip_list.txt
To create an Nmap command that scans UDP port 47808 (commonly used by BACnet) and common Windows ports and services typically found in an Active Directory (AD) environment, you can combine a set of well-known TCP ports associated with Windows services along with the UDP port. Here’s an example command:
1
nmap -Pn -sU -sT -p U:47808,T:135,T:139,T:445,T:3389,T:53 --script smb-protocols -iL ip_list.txt
To modify the Nmap command for scanning UDP port 47808 along with common Windows ports in an Active Directory environment, and to include only one NSE script that checks for the presence of SMB, you can use the following command:
1
nmap -Pn -sU -sT -p U:47808,T:135,T:139,T:445,T:3389,T:53 --script smb-os-discovery -iL ip_list.txt
-Pn: This option bypasses the discovery phase, assuming the target hosts are up.-sU -sT: Scans both UDP (-sU) and TCP (-sT) ports.-p U:47808,T:135,T:139,T:445,T:3389,T:53:Scans UDP port
47808(BACnet)Scans TCP ports
135(RPC),139(NetBIOS),445(SMB over TCP),3389(RDP), and53(DNS), which are common in Windows/AD environments.--script smb-protocols: Runs thesmb-protocolsscript to identify the SMB protocol versions supported by the target.-iL ip_list.txt: Reads the list of target IP addresses from the specified file.